***********************************************
CARA 1 (MENGGUNAKAN BACKGROUND YANG TERSEDIA)
************************************************
1. Gabung ke Grup ini dengan meng-klik "Gabung ke Grup ini"
2. Undang semua teman Anda untuk bergabung dengan meng-klik "Undang Semua Orang untuk Bergabung" dan PILIH SEMUA TEMANMU, lalu kirim undangan. INGAT!! KARENA HANYA ORANG YANG BERGABUNG DAN MENGINSTAL APLIKASI INI YANG DAPAT MELIHAT PERUBAHAN TAMPILAN ANDA.
3. Gunakan Browser Mozilla Firefox 3.0 , Internet Explorer 7.0 and 8.0 dan. Sementara browser Safari, Google Chrome, AOL, MSN, or IE 6 Tidak Bisa.
4. Masuk ke http://www.yontoo.com/DownloadFFClient.aspx
5. Pilih "Start Instal"l
6. Install Add-Ons tersebut dan setelah selesai restart Mozilla Firefox tersebut.
7. Kembali ke halaman Facebook Anda
8. Masuk ke http://apps.facebook.com/pagerage/
9. Lalu pilih tampilan Facebook yang Anda inginkan (klik Select).
10. Selesai dan lihat perubahannya di halaman Facebook Anda.
HASILNYA: http://www.facebook.com/photo.php?pid=861760&op=2&o=user&view=user&subj=94354179019&aid=-1&oid=94354179019&id=1366453727
************************************************
CARA 2 (JIKA ANDA INGIN MEMASUKKAN FOTO ANDA SEBAGAI BACKGROUND)
************************************************
1. Gabung ke Grup ini dengan meng-klik "Gabung ke Grup ini"
2. Undang semua teman Anda untuk bergabung dengan meng-klik "Undang Semua Orang untuk Bergabung" dan PILIH SEMUA TEMANMU, lalu kirim undangan. INGAT!! KARENA HANYA ORANG YANG BERGABUNG DAN MENGINSTAL APLIKASI INI YANG DAPAT MELIHAT PERUBAHAN TAMPILAN ANDA.
3. Gunakan Browser Mozilla Firefox 3 , Internet Explorer 7.0 and 8.0. Sementara browser Safari, Google Chrome, AOL, MSN, or IE 6 Tidak Bisa.
4. Instal Yontoo Layers, caranya sama seperti cara di atas
5. Buka : http://apps.facebook.com/pagerage/
6. Dipojok kiri atas klik "Create Your Own Backgrounds”
7. Memasukan Background gambar/foto yang telah di upload**, lalu Klik "Load Image"
8. Memilih Warna Font dan setting transparansi (Show Advanced Setting)
9. Klik “Apply Background”
10. Selesai dan lihat perubahannya di halaman Facebook Anda.
NOTE:
** Untuk step #7 yg dimasukan adalah link adress foto, contohnya seperti ini : http://i441.photobucket.com/albums/qq138/zaka2112/DEV6-1.gif
** Untuk mendapatkan link seperti itu kamu bisa upload foto kamu anatara lain melalui :
- http://www.photobucket.com
- http://www.imageshack.us
HASILNYA: http://www.facebook.com/photo.php?pid=869358&op=1&o=user&view=user&subj=94354179019&aid=-1&oid=94354179019&id=1366453727
************************************************
CARA 3 (DENGAN BANYAK PILIHAN TAMPILAN YANG BERVARASI)
************************************************
1. Gabung ke Grup ini dengan meng-klik "Gabung ke Grup ini"
2. Undang semua teman Anda untuk bergabung dengan meng-klik "Undang Semua Orang untuk Bergabung" dan PILIH SEMUA TEMANMU, lalu kirim undangan. INGAT!! KARENA HANYA ORANG YANG BERGABUNG DAN MENGINSTAL APLIKASI INI YANG DAPAT MELIHAT PERUBAHAN TAMPILAN ANDA.
3. Gunakan Browser Mozilla Firefox 3
4. Install Add-ons yang ada di https://addons.mozilla.org/en-US/firefox/addon/2108
5. Install Add-ons tersebut dengan meng-klik "Add to Firefox"
6. Dan setelah selesai restart Mozilla Firefox tersebut.
7. Login ke account facebook Anda.
8. Masuk ke http://userstyles.org/styles/site/facebook.com
9. Pilih tampilan facebook yang Anda inginkan.
10. Klik tombol “Load into Stylish”
11. Selesai dan lihat perubahannya di halaman Facebook Anda
HASILNYA: http://www.facebook.com/photo.php?pid=871287&op=1&o=user&view=user&subj=94354179019&aid=-1&oid=94354179019&id=1366453727
*****************************
CARA 4 (KHUSUS OPERA - DENGAN BANYAK PILIHAN TAMPILAN YANG BERVARASI)
*****************************
Baca dan ikuti langkah berikut sampai selesai.
1. Gabung ke Grup ini dengan meng-klik "Gabung ke Grup ini"
2. Undang semua teman Anda untuk bergabung dengan meng-klik "Undang Semua Orang untuk Bergabung" dan PILIH SEMUA TEMANMU, lalu kirim undangan. INGAT!! KARENA HANYA ORANG YANG BERGABUNG DAN MENGINSTAL APLIKASI INI YANG DAPAT MELIHAT PERUBAHAN TAMPILAN ANDA.
3. Gunakan Opera 9
4. Siapkan lokasi script, melalui Menu : Tools > Preferences > Advanced > Content >JavaScript options
Gambarnya : http://www.facebook.com/photo.php?pid=875957&op=1&o=user&view=user&subj=94354179019&aid=-1&oid=94354179019&id=1366453727
5. Masuk ke http://userstyles.org/styles/browse/all/facebook/popularity/desc/1
6. Pilih salah satu skin yang ingin digunakan, contoh : http://userstyles.org/styles/15332
Gambarnya : http://www.facebook.com/photo.php?pid=875958&op=1&o=user&view=user&subj=94354179019&aid=-1&oid=94354179019&id=1366453727
7. Klik tombol "Load as user script", opera menampilkan script kemudian simpan melalui menu File --> save as. Dengan nama skin.js (apa saja asal dengan nama belakang .js)
Gambarnya : http://www.facebook.com/photo.php?pid=875959&op=1&o=user&view=user&subj=94354179019&aid=-1&oid=94354179019&id=1366453727
8. Selesai dan lihat perubahannya di halaman Facebook Anda
HASILNYA: http://www.facebook.com/photo.php?pid=875960&op=1&o=user&view=user&subj=94354179019&aid=-1&oid=94354179019&id=1366453727
**Untuk mengganti theme, hapus file .js dan ikuti langkah 3 sampai selesai.
**Untuk diketahui, beberapa theme yg tersedia di http://userstyles.org/styles/browse/all/facebook/popularity/desc/1 ada yang tidak dapat ditampilkan, coba ganti dengan theme yg lain.
*************************************************
CARA MENGGANTI DAN MENGHAPUS TAMPILAN FACEBOOK
*************************************************
UNTUK CARA 1 & 2:
1. Masuk ke http://apps.facebook.com/pagerage/
2. Klik “Remove Current Layout From Your Profile Page”
3. Selesai dan silahkan lihat perubahannya di profil Facebook Anda
4. Untuk mengganti Tampilan tinggal Kita pilih Tampilan Lain di Pagerage dan Pastikan Yontoo dalam posisi Enable
CARA LAIN
## Apabila Anda Menggunakan Mozilla Firefox, Klik Tools -> Add-ons -> Klik Yontoo Layers -> Disable -> Klik Restart Firefox
## Apabila Anda mengginakan Internet Explorer, Klik Tools -> Manage Add-ons -> Toolbar and Extensions -> Klik Yontoo -> Disable > Lalu Restart Internet Explorer
UNTUK CARA 3:
Pada Mozilla Firefox Atas, Klik Tools -> Add-ons -> Klik Stylish -> Disable -> Klik Restart Firefox
UNTUK CARA 4:
1. Pada Browser Opera, Hapus File ber-ekstensi .js yang Anda Simpan (Lihat panduan pemasangan CARA 4 di atas)
2. Restart Opera dan Lihat Hasilnya pada Halaman Facebook Anda
--------------------------------------------------------------------------
MANFAAT BERGABUNG GRUP INI:
--------------------------------------------------------------------------
1. ANDA AKAN MENDAPATKAN UPDATE INFORMASI MENGENAI TAMPILAN FACEBOOK.
2. ANDA AKAN DIBANTU MENSETTING DAN MENGHAPUS TAMPILAN FACEBOOK ANDA.
3. ANDA DAPAT MEMBERIKAN MASUKAN DAN SARAN TENTANG PERUBAHAN TAMPILAN FACEBOOK UNTUK DI SHARE DENGAN ANGGOTA GRUP LAIN.
4. ANDA DAPAT BERBAGI SCREENSHOOT TAMPILAN BARU ANDA MELALUI ALBUM FOTO YANG BISA DILIHAT OLEH SEMUA ANGGOTA GRUP.
5. ANDA DAPAT MEMBERIKAN KELUHAN DAN SARAN ANDA MELALUI FORUM DISKUSI.
***********
DOWNLOAD BROWSER COMPATIBLE
***********
1. Opera 9.6.4 : http://opera.tradebit.com/pub/win/964/en/Opera_964_en_Setup.exe
2. Mozilla Firefox 3.5 : http://www.mozilla.com/products/download.html?product=firefox-3.5&os=win&lang=en-US
3. Internet Explorer 8 (ID) : http://www.microsoft.com/windows/internet-explorer/worldwide-sites.aspx
My Book

Mengubah tampilan Facebook

Motivasi
"Setiap manusia memiliki kelebihan dan kekurangannya
masing-masing.. yang perlu dilakukan adalah mengidentifikasi
keduanya, dan memutuskan apa yang akan dilakukan dengan kedua hal
tersebut"
Tutorial Access 2007 (bagian 1)

Membuat titik Kursor isian berada pada form atau kolom paling atas ketika tombol add record di tekan atau di tekan : (lihat gambar di kanan)
selengkapnya download here >>
Seminar Overclocking Dipadati Pengunjung
Menurut Christian Ricky, ketua penyelangara seminar dan workshop, peserta yang diperkirakan sekitar 100 peserta. Namun pada kenyataannya terjadi penambahan. Begitu pula dengan peserta perankitan personal Computer yang diadakan dua hari sebelumnya.
Ketertarikan dalam mengkuti seminar overclocking ini diakui oleh beberarapa peserta dikarenkan oleh rasa ingin tau.” Alasan saya datang ke seminar ini adalah karena saya ingin tau tentang overclocking”, ungkap Iin, mahasiswi Teknologi Informatika dari Universitas Islam Negeri (UIN). Hal senada diungkapkan pula olah Refa, Mahasiswa Teknologi Informatika LPKIA,Bandung , “ Sekalipun saya sudah beberapa kali mengikuti seminar seperti ini namun, saya selalu tertarik untuk ikut. Selain itu, pada seminar kali ini pembicara yang menyampaikan bahan adalah orang-orang yang potensial di bidang overclocking.”
baca selengkapnya >>
Hati-hati Pencurian Data "Login"
E-mail di atas begitu meyakinkan. Dilengkapi kepala surat (header) yang ada logo Paypal-nya dan juga catatan kaki (footer) yang memuat trademark Paypal yang sudah dikenal kredibilitasnya untuk transaksi online realtime itu.
Siapa pun sepintas tak curiga menerima e-mail itu. Pengguna Paypal aktif pasti menyangka e-mail itu tak salah alamat dan benar-benar dari Paypal. Padahal, e-mail itu dikirim acak ke jutaan pengguna lain dengan sistem massal, tanpa mempertimbangkan apakah e-mail tersebut menjadi anggota Paypal atau tidak. Begitu yang menerima pengguna Paypal, kesempatan menjadi korban makin besar.
Begitu menekan link "Resolution Center", akan keluar www.paypalupdate.com yang tampilannya sama dengan situs asli www.paypal.com. Di tampilan web itu ada permintaan memasukkan username e-mail dan password. Begitu memasukkan informasi itu, dalam sekejap data login bisa berpindah tangan.
Dalam sekejap, hitungan menit, bisa jadi pemilik situs Paypal palsu telah mengeruk dana untuk ditransfer ke rekening Paypal lainnya. Jika sudah demikian, jangan berharap uang kita bisa kembali.
Memilukan memang. E-mail phising yang berisi tipu-tipu itu kini banyak beredar. Tak hanya dari paypalupdate.com seperti contoh di atas, tetapi sudah ada puluhan situs pengacau. Hebatnya, Gmail dan Yahoo sebagai penyelenggara e-mail gratis terbesar yang dikenal jagoan dalam menyaring e-mail sampah tak bisa mendeteksi e-mail jahat itu.
Sistem antivirus juga tidak memiliki metode valid memverifikasi apakah situs tersebut jahat atau tidak. Tetapi, masih ada harapan karena browser modern Mozilla Firefox bisa dengan cepat mengidentifikasi web jahat semacam itu. Untuk kasus di atas, Internet Explorer keluaran Microsoft tak memiliki warning.
Paypal adalah sistem transaksi online terbesar yang menggunakan e-mail sebagai "rekening" seseorang. Dengan e-mail yang sudah didaftarkan dan sudah memasukkan data kartu kredit di dalamnya, kita bisa menjadikan Paypal sebagai alat transaksi realtime terpercaya.
Karena itu, pencurian data login pada alat pembayaran online adalah sama dengan pencurian dompet di dunia nyata. Pencurian data login ini akan terus merajai kasus-kasus kejahatan internet tahun 2008 ini.
Kompas sempat mengirim contoh e-mail yang dicurigai sebagai e-mail phising ke tim pendukung Paypal. Biasanya, setelah menerima laporan seperti itu, Paypal akan melakukan aksi menghentikan situs tersebut.
Korban "chatting"
Beberapa hari lalu, di mailing list juga beredar cerita dari korban kejahatan pencurian data login. Kali ini yang menjadi sasaran adalah pengguna akun e-mail Yahoo dan Yahoo Messenger (YM) yang biasa digunakan untuk percakapan online atau chatting.
Cara ini sebenarnya lebih "kasar" karena kebanyakan "aktivis" YM sudah banyak yang mafhum bahwa ajang chat lewat YM bisa dimanfaatkan orang iseng untuk penyebaran virus dan kejahatan konvensional lainnya. Tetapi, hingga kini para programmer jahat (cracker) terus menemukan lubang keamanan sehingga masih banyak orang yang tertipu.
Salah satu cara adalah mengirim alamat link yang berisi situs tertentu yang langsung mengunduh file. Pengiriman pesan yang berisi link itu tentu saja dilakukan secara massal dan korban pun berjatuhan.
"Awalnya seorang teman chatting via YM bilang dia mau kirim file dan dia minta calon korban download file gambar. Setelah download file selesai, korban tak bisa lagi mengaktifkan YM, Yahoo Mail, dan Friendster," begitu seorang teman bercerita.
Tanpa disadari, korban tadi telah mengunduh file berisi virus trojan atau kemungkinan spyware. Trojan inilah yang mengirimkan informasi spesifik ke remote komputer mengenai data login. Tidak hanya Yahoo, bisa data login apa pun yang ada. Sistem antivirus yang ter-update sebenarnya bisa mendeteksi spyware ini, namun spyware terbaru selalu bisa mengamuflase dirinya.
Dengan keahlian memanipulasi skrip pemrograman, yang semua tutorialnya tersedia di internet, seorang pembuat trojan dan malware bisa mendapatkan data yang diinginkan. Jika data login sudah didapatkan, sang cracker pun bisa login "menyamar" dan berkomunikasi dengan teman-teman korban.
"Cracker tersebut chatting dengan teman-teman korban, bilang kalau dia perlu uang. Salah seorang teman percaya dan langsung mentransfer dana tanpa mengecek apa benar orang yang diajak chatting adalah teman dia," begitu kisahnya.
Dalam kisah yang ekstrem, dengan menguasai e-mail berarti bisa menemukan pula data keuangan korban jika si korban juga menggunakan transaksi online. Karena itu, pencurian data login bukan persoalan sepele.
Tahun 2008 ini akan menjadi ujian bagi generasi Web 2.0 yang menjadikan sistem keanggotaan dengan data login sebagai andalan. Diperkirakan, akun di situs ternama seperti Yahoo, Friendster, MySpace, dan situs-situs jaringan pertemanan lainnya akan terus menghadapi gangguan.
Penulis: Amir Sodikin
Sumber: Kompas
http://www.kompas.co.id/tekno/read.php?cnt=.xml.2008.02.14.15323684&channel=7&mn=115&idx=115
Instal MacOS di Windows Vista

JAKARTA, SELASA - Apple Macintosh (Mac OS) dan Microsoft Windows merupakan dua kubu yang saling berseteru. Saking bermusuhannya kedua kubu ini, dulu praktis Anda harus membeli dua perangkat komputer jika ingin merasakan Mac OS dan Windows secara bersamaan. Mac OS harus berjalan di komputer Macintosh dan Windows harus diinstal di PC.
Seiring dengan penggunaan prosesor Intel di mesin Mac, Windows dan Mac OS mulai akur. Kedua sistem operasi ini dapat disandingkan bersama dalam satu komputer. Bahkan dari percobaan PCplus, dengan sedikit “trik” Anda dapat menjalankan Mac OS X “di atas” sistem operasi Windows Vista.
Untuk mengimplementasikan skema di atas, dua “alat perang” perlu Anda persiapkan. Yang pertama yaitu software VM ware, dapat diunduh di www.vmware.com dan yang kedua ialah DVD installer Mac OS X versi 10.4.5 atau 10.4.6 atau 10.4.7 atau 10.4.8 untuk komputer berprosesor x86. Demi kenyamanan Anda, PCplus menyarankan Anda untuk menggunakan VM ware Server atau VM ware Workstation. Karena kedua versi VM ware ini dilengkapi GUI dan petunjuk yang lengkap. Namun jika Anda ingin menggunakan VM ware yang gratis, Anda dapat memilih VM ware Player.
Jika dua “senjata” tersebut telah siap, selanjutnya ikuti langkah berikut:
1.
Jalankan VM ware Workstation melalui menu [Start] > [All Programs] > [VM ware] > [VM ware Workstation].
2.
Buat Virtual Machine baru dengan mengklik tombol [New Virtual Machine] yang terdapat di halaman depan.
3.
Saat muncul wisaya, klik Next.
4.
Pilih Custom pada wisaya selanjutnya dan klik [Next] sebanyak dua kali.
5.
Pada wisaya pemilihan sistem operasi, pilihlah Other dan untuk versinya pilih FreeBSD. Khusus bagi pengguna komputer dengan prosesor Intel Core 2 Duo (Conroe) dan Core Duo dengan chipset 945PM (Calistoga), Anda harus memilih sistem operasi Microsoft Windows dengan versi Windows NT. Langkah ini perlu dilakukan guna menghindari Core 2 Duo gagal memboot DVD MacOS. Jika sudah diset dengan benar, klik [Next].
6.
Berikan nama Virtual machine yang baru Anda buat dengan nama MacOS X untuk memudahkan identifikasinya, kemudian klik [Next].
7.
Saat ditanya jumlah prosesor virtual yang akan dibuat, jawab dengan opsi [One]. Sebaiknya Anda tetap memilih opsi ini meskipun terdapat dua prosesor pada komputer Anda guna menghindari kegagalan dalam proses instalasi.
8.
Tentukan alokasi memori yang akan Anda berikan pada Mac OS. Agar performa komputer Anda dan Mac OS tetap terjaga, sebaiknya Anda menggunakan memori minimal 128 MB atau setidaknya 256 MB. Mengalokasikan memori virtual ini terlalu besar sangat tidak disarankan. Sebab, hal ini akan menambah penggunaan memori swap dan menyebabkan komputer bekerja sangat lambat, baik di Windows Vista ataupun di Mac OS. Dalam percobaan ini PCplus menggunakan memori 512 MB dari total memori 1,5 GB yang terpasang di komputer. Setelah pengaturan ini selesai dilakukan, klik [Next].
9.
Agar OS virtual Anda dapat “bergabung” dengan ethernet Vista, Anda dapet memilih opsi [Use bridged networking] pada wisaya jenis jaringan. Klik [Next] sebanyak dua kali.
10.
Saat muncul wisaya pembuatan virtual disk, pilih [Create a new virtual disk], kemudian klik [Next].
11.
Selanjutnya tentukan jenis Virtual disk yang ingin Anda buat. Apakah IDE atau SCSI dilanjutkan dengan mengklik [Next].
12.
Di wisaya Specify Disk Capacity, tentukan besaran hard disk virtual yang ingin Anda buat pada kolom Disk size (GB).
13.
Setelah mengklik [Next] Anda akan dibawa ke wisaya terakhir yang menentukan lokasi penyimpanan hard disk virtual Anda. Demi meningkatkan performa komputer Anda, usahakan agar lokasi hard disk virtual ini diletakkan di hard disk yang terpisah secara fisik dengan sistem operasi utama Anda. Ini perlu dilakukan guna mencegah kedua sistem operasi tersebut saling berebut sumber daya pada hard disk yang sama.
14.
Terakhir, klik [Finish] dan tutup jendela VM ware
15.
Sekarang, buka Windows Explorer dan jelajahi lokasi Anda menyimpan seting VM ware tadi. Lokasi defaultnya yaitu di folder dokumen Documents\Virtual Machines\MacOS X. Buka file konfigurasi virtual machine berekstensi .vmx dengan Notepad. Caranya, cukup dengan mengklik kanan nama file berekstensi .vmx tersebut kemudian pilih Open With dan pilih Notepad pada daftar aplikasi.
16.
Tambahkan baris paevm=”true” pada baris paling akhir. Apabila dengan konfigurasi yang telah ada VM ware gagal memboot mesin virtual, Anda dapat megubah baris scsi0.present = “TRUE” dengan scsi0.present = “FALSE”.
17.
Simpan file konfigurasi vmx.
18.
Sekarang tiba saatnya menginstal MacOS. Masukkan DVD installer Mac OS dan nyalakan virtual machine dengan mengklik tombol [Power on this virtual machine].
19.
Saat proses booting DVD Mac OS, tekan tombol F8 di keyboard kemudian ketik –v. Perintah ini akan membawa Anda ke mode Verbose yang akan mempermudah Anda mendeteksi kesalahan jika terjadi kegagalan dalam proses boot. Tunggulah beberapa saat.
20.
Setelah layar graphical user interface (GUI) mulai muncul, ikuti tahapan installasi hingga tahapan pemilihan hard disk. Jika Anda telah sampai di tahapan ini, klik menu [Utilities] > [Disk Utility].
21.
Pilih VM ware drive pada panel kiri, kemudian klik Partition pada panel kanan.
22.
Ubah skema Volume partisi ke posisi 1 dan tentukan namanya. Pastikan format yang akan terbentuk adalah Mac OS Extended (Journaled) dan alokasikan semua sisa ruang yang tersedia untuk partisi tersebut.
23.
Klik [Partition] kemudian klik [Partition] sekali lagi. Setelah proses format selesai, Anda dapat menutup jendela Disk Utility. Partisi Anda akan muncul di halaman set up. Lanjutkan proses instalasi ke tahapan selanjutnya.
24.
Jika Anda menggunakan prosesor Intel dengan dukungan SSE2, pada pilihan instalasi, pastikan Anda memilih Customize dan berikan tanda cek pada bagian patch untuk menginstal patch yang tersedia untuk hardware Anda. Apabila Anda melewati tahapan ini dengan langsung mengklik [Continue], kemungkinan besar instalasi Mac OS Anda tidak akan dapat digunakan dan sistem operasi akan selalu meminta restart.
25.
Terakhir Anda cukup mengklik [Continue] dan menunggu proses instalasi selesai. Apabila proses instalasi telah selesai, Anda bisa langsung menikmati sistem operasi milik Apple di Windows Vista.
Selamat mencoba!
source:
http://www.kompas.co.id/tekno/read.php?cnt=.xml.2008.02.04.2122165&channel=7&mn=117&idx=117
Buku Pertama
Oleh: Badan Perpustakaan Daerah Jawa Barat
Judul : Kreatif dengan Microsoft Word 2003

Teks Berjalan
Pada pembahasan kali ini, akan ditunjukan langkah-langkah bagaimana cara membuat scorling text tersebut.
1. Tuliskan teks yang akan digunakan. contohnya:
Mau cetak foto ngapain harus pergi jauh-jauh. Kamu hanya perlu sebuah komputer dan printer di rumah kamu. Soal designnya kamu tinggal pesan melalui web ini.
2. Blok seluruh Teks yang akan digunakan.
 3. Pada toolbar ini (gambar.)
pilih menu split. Menu ini akan memunculkan code dan designnya. Dilayar akan akan tampil dua bagian itu.

4. Sekarang beralihlah pada bagian codenya. Sama seperti pada bagian design (bawah), pada bagian code pun tulisan yang sebelumnya di blok akan terblok.
(contoh )

5. Perhatikan pada kata pertama yang terblok atau kata pertama pada kalimat yang akan digunakan
-masukan tanda < untuk membuka perintah contoh : < Mau cetak foto...dst. -setelah tanda itu dimasukan maka secara otomatis atau dengan sendirinya akan muncul popup menu seperti pada contoh: (gambar)

cari dan pilih menu marquee lalu tekan enter.
- Kelanjutan proses perintahnya akan muncul seperti ini: <>
- Beri/tekan tombol spacebar pada keyboard agar ada jarak antara kata marque dengan "Mau...dst.
Hasilnya akan seperti ini< marquee Mau cetak foto...dst
-Saat diberi spasi maka dengan sendirinya akan muncul menu baru. Lihat gambar
-pilih menu behavior jika ingin membuat tulisan bergerak dari kiri ke kanan.

- Pilih menu direction jika ingin membuat tulisan bergerak dari atas atau atau bawah dan dari kanan atau kiri

hasilnya akan seperti ini:
<.marquee direction="" Mau cetak foto...dst atau <.marquee behavior="" Mau cetakfoto...dst
-jika memilih menu behavior akan muncul lagi menu pilihan :
*Alternate = membuat teks bergerak dari kiri ke kanan lalu bergerak kembali dari kanan ke kiri.
*slide = membuat teks bergerak satu kali dari kiri ke kanan. Setelah itu teks tidak akan kembali bergerak. Berakhir pada kata-kata terakhir.
*Scroll = teks akan bergerak terus menerus dari kiri ke kanan dan dilanjutkan kembali dari kiri ke kanan. -jika memilih menu direction akan muncul lagi menu pilihan:
* Up = membuat teks bergerak dari bawah ke atas
*Down = membuat teks bergerak dari atas ke bawah.
*Left = membuat teks bergerak dari kanan ke kiri.
*Right = membuat teks bergerak dari kiri ke kanan.
misalnya kita memilih up, maka hasilnya akan seperti ini:
<.marquee direction= "up"Mau cetakfoto...dst
-Langkah selanjutnya adalah mengatur kecepatan dari teks yang akan berjalan tersebut.
-Beri jarak setelah pilihan "up"
="up"Mau cetakfoto...dst
hasilnya akan seperti ini
="up" Mau cetakfoto...dst
-setelah memberi jarak dengan spasi maka akan kembali muncul menu baru .
Pilihlan menu scrollamount. Tekan enter untuk memilih.'

maka hasilnya akan seperti ini :<.marquee direction="up" scrollamount=""Mau cetak foto...dst. beri tanda > setelah tanda " untuk menutup perintah.
hasilnya akan seperti ini
...scrollamount="3">Mau cetak foto...dst.
setelah memberi tanda > maka dengan sendirinya akan muncul <./marquee>
hasilnya :<.marquee direction="up" scrollamount="3">. <./marquee>
Pindahkan <./marquee>tersebut ke akhir kalimat
hasilnya :
..dst pesan melalui web ini. mudah kan <./marquee>
hasil keseluruhan nya adalah seperti ini :
< .marquee direction="up" scrollamount="3">Mau cetak foto ngapain harus pergi jauh-jauh. Kamu hanya perlu sebuah komputer dan printer di rumah kamu. Soal designnya kamu tinggal pesan melalui web ini. mudah kan..<./marquee>
Hasil:
Setelah selesai semua proses jangan lupa menyimpan hasil pekerjaannya. Dan untuk menampilkan tekan tombol F12.
nb: abikan jika menemukan tanda titik (.) pada rumus.
Membuat mail merge di MS WORD 2007
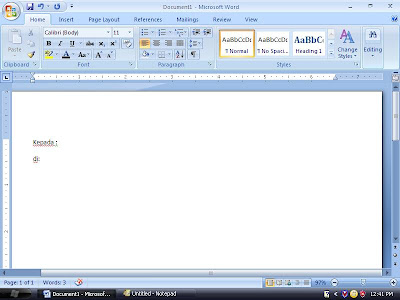
2. Pilih menu Mailings

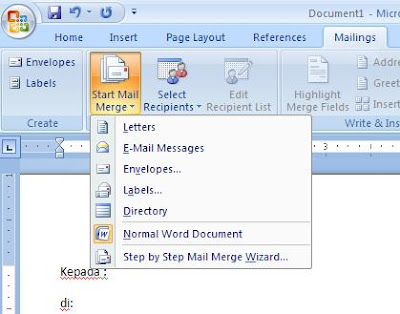
4. Pilih menu Step by step Mail Merge Wizard
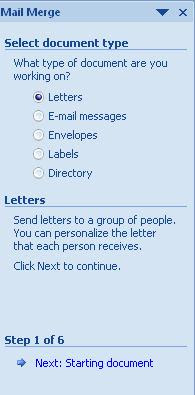
6. Pada step ke-2, pilihlah use the current document untuk menggunakan dokumen yang sedang digunakan atau pada saat awal telah di buat.Setelah itu dilanjutkan dengan menekan tombol next yang ada di bawah.
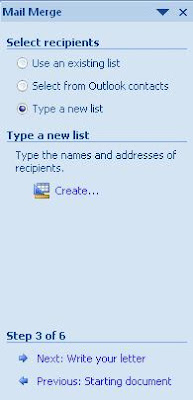
8. Setelah muncul menu New addres list, pilih sub menu Customize Address list. sub menu ini digunakan jika kita hendak mengganti judul data yang akan di masukan.
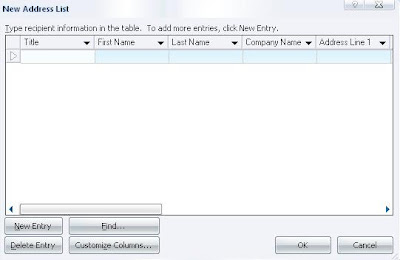
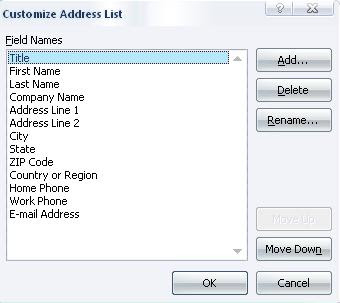
9.Pada sub menu tersebut telah terdapat daftar judul data. Untuk menghapusnya tekan menu Delete.
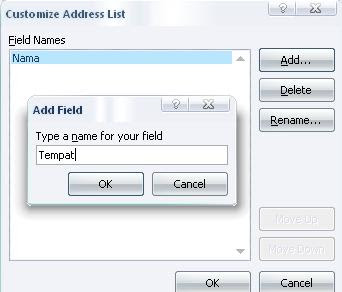
10. Untuk memasukan judul data yang baru sesuai keinginan, pilihlah menu Add. Isi kolom kosong yang tersedia dengan judul data yang dibutuhkan dengan menekan menu insert. Tekan OK untuk mengakhiri. Sebagai contoh : nama, tempat (lihat gambar)
 11. Setelah proses itu selesai, isilah judul data dengan data-data yang dibutuhkan dengan menekan menu new entry. Contoh : judul nama diisi dengan Rudi, Desy, Hadi, Romy.Untuk mengakhiri tekan OK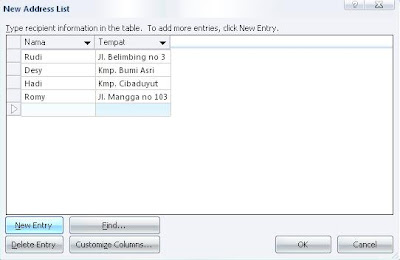
12. Secara otomatis akan muncul menu save. Simpanlah data yang tadi telah dibuat, misalnya di my dockumen. Beri nama file data tersebut, misalnya latihan mail merge. Setelah itu akan muncul menu mail merge recipients. Jika sudah yakin dengan data yang dimasukan pilih lah OK.
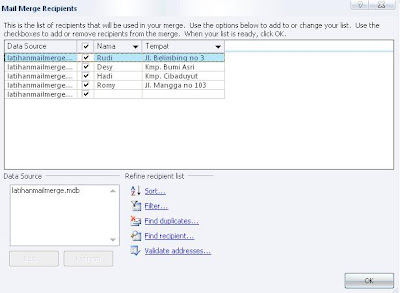
13. Namun jika anda menemukan ada data yang salah saat anda masukan, maka klik nama file yang ada di kolom data source. Lalu pilih menu Edit.
14. Jika sudah kembali ke lembar kerja di Ms WORD, pilihlah menu insert Merge field.
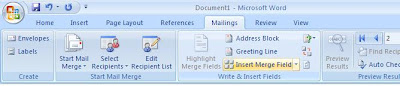
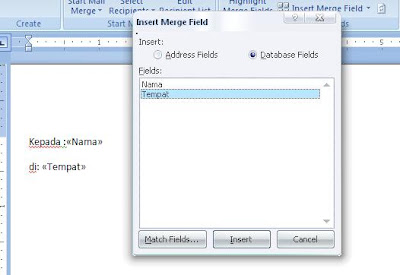
15. Masukan judul data pada tempat yang sesuai. Misalnya nama dimasukan setelah kata kepada.
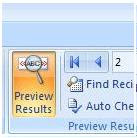
16. Untuk menampilkan hasilnya pilih toolbar Preview Results

Are you Ready....?
Kini kebutuhan akan data penyimpanan, sudah semakin terus bertambah. Orang lebih senang menyimpan foto di dalam computer atau fasilitas internet dari pada menyimpannya di album foto. Orang pun lebih senang mendengarkan lagu dan menonton video rekaman dari ipod atau komputer mereka daripada memutar kaset menggunakan tape atau media player.
Kebutuhan yang semakin tinggi itu, ‘untungnya’ didukung oleh berkembangnya jenis media penyimpanan. Lepas dari masa media penyimpanan floopy disk (disket), Compact Disk(CD) dan CD-RW (Rewrite) menjadi salah satu media paforite untuk menyimpan data. Media tersebut hadir dengan kemampuannya dalam menyimpan data hingga 700 MB.
Tak lama kemudian, DVD (digital versatile disc) dan disusul oleh DVD-RW muncul kepasaran pencinta teknologi dengan kemampuannya menyimpan data hingga 4,3GB. Tentu hal ini, lagi-lagi, menjadi madu yang manis bagi pencinta teknologi. Selalu saja ada perubahan kebutuhan saat muncul media penyimpanan dengan kemampuan menyimpan data yang lebih besar.
Sekarang, kebutuhan itu kembali diusik oleh hadirnya Blu Ray dan HD- DVD,yang bila dibandingkan dengan media penyimpanan sekarang (CD dan DVD, bahkan flashdisk), jauh lebih memberi kepuasan dalam menyimpan data. Uh...sepertinya "madu " itu semakin manis saja.
Seperti dikutip dari http://www.pikiran-rakyat.com/ bahwaDisc optikal Blu-ray yang dirancang oleh Blu-ray Disc Association yang beranggotakan nama-nama besar di bidang elektronik macam Apple, Dell, Hitachi, HP, JVC, LG, Mitsubishi, Sony, TDK, dan Philips. Blu-ray memang dirancang untuk menyimpan data dalam jumlah yang cukup besar. Kapasitas penyimpanannya hingga 5-6 kali lipat kapasitas keping DVD. Jadi, jika satu keping DVD single layer memuat data sebanyak 4,7 GB, Blu-ray mampu menampung data hingga 25 GB per layer.
Kemampuan menyimpan data yang cukup besar ini dikarenakan Blu-ray memanfaatkan laser biru-violet yang mempunyai panjang gelombang 405 nm (nanometer) untuk membaca dan menulis data, sedangkan DVD yang memanfaatkan laser merah mempunyai panjang gelombang 650 nm. Dengan gelombang yang lebih pendek, ia bisa menyorot objek dengan presisi tinggi. Hasilnya, data bisa diikat dengan lebih ketat dan disimpan di ruang yang lebih kecil. Jadi, inilah yang memungkinkan Blu-ray menyimpan data lebih banyak daripada CD, DVD, atau HD DVD walau bentuk ukuran kepingnya sama.
Blu-ray memiliki lapisan permukaan yang tipis, hanya 0,1 mm, jauh lebih tipis dibanding dengan HD DVD yang berukuran 0,6 mm. Ketipisan ini bertujuan agar laser lebih fokus dalam menembakkan data. Namun, ketipisan inilah yang membuat harga Blu-ray jadi lebih mahal karena adanya proses hard coating khusus dalam pengerjaannya. Untuk urusan baca dan tulis (read and write) Blu-ray mempunyai kecepatan minimal sekitar 36 Mbps. Bahkan rencananya akan ditingkatkan hingga 288 Mbps. Bandingkan dengan DVD yang mempunyai kecepatan baca tulis hanya 10 Mbps. Walaupun formatnya tergolong beda, Blu-ray memiliki kompabilitas dengan format terdahulunya semacam CD atau DVD.
Pesaing yang cukup membuat pencinta teknologi berfikir dua kali adalah HD-DVD (High-Definition DVD ). HD DVD dapat menampung data sebanyak tiga kali data yang ditampung DVD (15 GB per lapis berbanding 4,7 GB). Sama dengan Blu-ray, HD DVD menggunakan laser blue dengan panjang gelombang 405 nm. Lapisan data terletak tepat di tengah disc yang memiliki ketebalan 1,2 mm. Menggunakan mata laser dengan NA 0,65. Hanya selisih sedikit, jika dibandingkan DVD yang menggunakan NA 0,6.
Menurut situs http://www.pcmedia.co.id/, HD DVD memiliki standar yang unik. Sebagai contoh, ada alternatif solusi Combination Format dengan memanfaatkan kedua sisi keping untuk menyimpan data. Salah satu sisi dengan format konvensional DVD-9 dan pada sisi yang lain denagn HD DVD.
Atau dengan alternatif lainnya dengan Twin format disc. Merupakan sebuah standar format yang diakui DVD Forum dalam HD DVD-ROM versi 1.2. dengan menggunakan dua lapisan data. Lapisan pertama terdekat dengan lensa hanya akan terbaca oleh lensa red laser, namun transparan untuk blue-violet laser. Ditambah lapisan data untuk HD DVD. Jika keping ini dibaca oleh DVD “biasa”, maka ia akan dikenali dengan baik. Sedangkan pada perangkat HD DVD, blue-violet laser akan melewati lapisan data pertama dan membaca hanya pada lapisan data HD DVD.
Untuk kapasitas, HD DVD-ROM berdiameter 12 cm memiliki kapasitas 15 GB per layer. Dengan dual layer dan double sided, maka akan memiliki kapasitas 30 GB per keping.
HD DVD juga tersedia dalam dimensi berdiameter 8 cm, dengan kapasitas 4,7 GB untuk single layer dan 9,4 GB untuk double layer. Media untuk writeable disebut HD DVD-R dengan kapasitas 15 GB per side. Untuk media rewriteable menawarkan kapasitas 20 GB per side.
Untuk dapat mendukung kepuasan konsumen dengan hadirnya kedua media tersebut, beberapa perusahaan besar seperti SONY, Toshiba, dan Samsung menghadirkan media player dan juga perangkat teknologi lainnya yang support terhadap kedua media penyimpanan tersebut.
Contohnya, perusahaan Toshiba yang meluncurkan pemutar HD DVD di Jakarta bersamaan dengan peluncurkan produk TV LCD. Di antara TV itu, Regza X3500 dan Z3500 memang sudah mendukung untuk penayangan full HDTV (1920 x 1080 piksel) yang merupakan kualitas terbaik yang bisa dihasilkan produk pemutar HD DVD ataupun Blu-ray. Tidak ketinggalan, Perusahaan raksasa asal Jepang, Sony, telah mencangkokkan player disc drive-nya untuk memutar Blu-ray pada produk larisnya PlayStation 3 (PS3).
So….., Are you ready for changes…?
Dokterdotcom.blogspot.com
Blu Ray VS HD DVD
From Wikipedia, the free encyclopedia
(Redirected from Blue ray)
Jump to: navigation, search
Blu-ray Disc
Media type:
High-density optical disc
Encoding:
MPEG-2, MPEG-4 AVC (H.264), and VC-1
Capacity:
25 GB (single layer), 50 GB (dual layer)
Read mechanism:
1x@36 Mbit/s & 2x@72 Mbit/s
Developed by:
Blu-ray Disc Association
Usage:
Data storage, High-definition video and PlayStation 3 Games
A Blu-ray Disc is a high-density optical disc format for the storage of digital information, including high-definition video.
Contents[hide]
1 Overview
2 History
3 Disc structure
3.1 Laser and optics
3.2 Hard-coating technology
4 Software standards
4.1 Codecs
4.2 Java software support
4.3 Region codes
4.4 Digital rights management (DRM)
5 Player profiles
6 Backward compatibility
7 List of Blu-ray devices
8 Corporate support
9 Blu-ray Disc / HD DVD comparison
10 Ongoing development
11 Variants
11.1 BD9 / Mini-Blu-ray Disc
11.2 AVCREC
11.3 Blu-ray Disc recordable
11.4 HD DVD / Blu-Ray hybrid discs
12 See also
12.1 Alternative disc technologies
13 References
14 External links
14.1 News
//
[edit] Overview
Optical disc authoring
Optical disc
Optical disc image
Optical disc drive
Authoring software
Recording technologies
Recording modes
Packet writing
Optical media types
Laserdisc
Compact disc (CD): CD-Audio, PhotoCD, CD-R, CD-ROM, CD-RW, Video CD, SVCD, CD+G, CD-Text, CD-ROM XA, CD-Extra, CD-i Bridge, CD-i
MiniDisc
DVD: DVD-R, DVD-D, DVD-R DL, DVD+R, DVD+R DL, DVD-RW, DVD+RW, DVD-RW DL, DVD+RW DL, DVD-RAM
Blu-ray Disc: BD-R, BD-RE
HD DVD: HD DVD-R, HD DVD-RW, HD DVD-RAM
UDO
UMD
Holographic data storage
3D optical data storage
History of optical storage media
Standards
Rainbow Books
File systems
ISO 9660
Joliet
Rock Ridge
Amiga Rock Ridge extensions
El Torito
Apple ISO9660 Extensions
Universal Disk Format
Mount Rainier
A blank rewritable Blu-ray disc (a BD-RE)
The name Blu-ray Disc is derived from the blue-violet laser used to read and write this type of disc. Because of its shorter wavelength (405 nm), substantially more data can be stored on a Blu-ray Disc than on the DVD format, which uses a red (650 nm) laser. A single layer Blu-ray Disc can store 25 gigabytes (GB), over five times the size of a single layer DVD at 4.7 GB. A dual layer Blu-ray Disc can store 50 GB, almost six times the size of a dual layer DVD at 8.5 GB.
Blu-ray was developed by the Blu-ray Disc Association, a group of leading companies representing consumer electronics, computer hardware, and motion picture production. The standard is covered by several patents belonging to different companies. As of March 2007, a joint licensing agreement for all the relevant patents has not yet been finalized.[1]
As of October 23, 2007, 351[2] titles have been released on Blu-ray Disc in the United States (32 of those titles have since been discontinued). As of October 9, 2007, 179 titles have been released in Japan, with 55 titles planned for release.[3]
The Blu-ray standard is currently in a format war with its rival HD DVD, to determine which (if either) of the two formats will become the leading carrier for high-definition content to consumers.
[edit] History
In the mid 1990s, commercial HDTV sets were finally starting to enter a larger market. However, there was no good, cheap way to record or play back HD content. There was no cheap storage medium that could store that amount of data, except JVC's Digital VHS and Sony's HD Betacam.[4] However, it was well known that using lasers with shorter wavelengths would yield optical storage with higher density. When Shuji Nakamura invented practical blue laser diodes, it was a sensation, although a lengthy patent lawsuit delayed commercial introduction.[5]
Sony started two projects applying the new diodes: UDO (Ultra Density Optical) and DVR Blue (together with Pioneer), a format of rewritable discs which would eventually become Blu-ray (more specifically, BD-RE).[6] The core technologies of the formats are essentially similar.
The first DVR Blue prototypes were unveiled at the CEATEC exhibition in October 2000.[7] Because the Blu-ray Disc standard places the data recording layer close to the surface of the disc, early discs were susceptible to contamination and scratches and had to be enclosed in plastic cartridges for protection. In February 2002, the project was officially announced as Blu-ray,[8] and the Blu-ray Disc Association was founded by the nine initial members.
The first consumer devices were in stores on April 10 the next year. It was the Sony BDZ-S77 a BD-RE recorder that was only made available in Japan. The recommended price was US$3800.[9] However, there was no standard for pre-recorded video (BD-ROM); no movies were released for that player. That standard was still years away, since a new and secure DRM system was needed before Hollywood studios would accept it. Nobody wanted to repeat the failure of the Content Scramble System for DVDs.
The DVD Forum (which was chaired by Toshiba) was deeply split over whether to go with the more expensive blue lasers or not. In March 2002, the forum voted to approve a proposal endorsed by Warner Bros. and other motion picture studios that involved compressing HD content onto dual-layer DVD-9 discs.[10][11] However, in spite of this decision, the DVD Forum's Steering Committee announced in April that it was pursuing its own blue-laser high-definition solution.[12] In August, Toshiba and NEC announced their competing standard Advanced Optical Disc.[13] It was finally adopted by the DVD forum and renamed to HD DVD the next year,[14] after being voted down twice by Blu-ray Disc Association members, prompting the U.S. Department of Justice to make preliminary investigations into the situation.[15][16] Three new members had to be invited and the voting rules changed before the vote finally passed.[17][18]
In the mean time, Sony spun off Professional Disc for DATA from the Blu-ray project. It was essentially Blu-ray with higher-quality media and components. The devices were too expensive for the consumer mass market. Instead, it was aimed at the professional data storage space market as a replacement for their line of 5.25" MO drives. It was announced in October 2003, with the first devices shipping in December of the same year.[19][20]
The costs of a format war are large, both for consumers and for the industry. In an attempt to avoid that, Blu-ray Disc Association and DVD Forum started to negotiate a compromise in early 2005. One of the issues was that the Blu-ray camp wanted to use a Java-based platform for interactivity (BD-J), while the DVD Forum was promoting Microsoft's "iHD" (which became HDi).[21] A much larger issue, though, was the physical formats of the discs themselves; the Blu-ray member companies did not want to risk losing billions of dollars in royalties as they had done with standard DVD.[22] An agreement seemed close, but negotiations proceeded slowly.[23]
At the end of June 2005, Sun announced that the Blu-ray Association had chosen the Java-based BD-J interactivity layer instead of Microsoft's HDi. This was based on a BDA board vote favouring BD-J 10 to 4, despite a technical committee previously favouring HDi by a vote of 7 to 5.[24] At the same time, Microsoft and Toshiba jointly announced that they would cooperate in developing high-definition DVD players.[25] In a top-level meeting in July, Microsoft's Bill Gates argued that the Blu-ray standard had to change to "work more smoothly with personal computers". The Blu-ray Disc Association's representatives defended the technology.[26]
On August 22, 2005, the Blu-ray Disc Association and DVD Forum announced that the negotiations to unify their standards had failed.[27] Rumours surfaced that an "unnamed partner" had pressured Toshiba to stick with HD DVD—in spite of Blu-ray's strong support among Hollywood studios and some analysts saying that HD DVD's days were numbered—but these rumours were denied by the parties involved; instead, the same reasons of physical format incompatibility were cited.[22][26] At the end of September, Microsoft and Intel jointly announced their support for HD DVD.[28]
HP made a last attempt to broker a peace between with Blu-ray Disc Association and Microsoft. The company demanded that the Blu-ray association adopted Microsoft's HDi instead of its own Java solution, and that Blu-ray would adopt a mandatory managed copy feature. If the demands weren't met, HP threatened to support HD DVD instead.[29] In a research report, Gartner analysts Van Baker, Laura Behrens and Mike McGuire wrote that if HP's proposal was accepted, Blu-ray would become the winner of the format war.[30] However, the Blu-ray disc group did not accept HP's offer.[31]
The Blu-ray physical specifications were finished in 2004.[32] In January 2005, TDK announced that they had developed a hard coating polymer for Blu-ray discs.[33] The cartridges, no longer necessary, were scrapped. The BD-ROM specifications were finalized in early 2006.[34] AACS LA, a consortium founded in 2004,[35] had been developing the necessary DRM platform that could securely distribute movies to consumers. However, the final AACS standard was delayed,[36] and then delayed again when an important member of the Blu-ray group voiced concerns.[37] At the request of Toshiba, an interim standard was published which did not include some features, like managed copy.[38]
The first BD-ROM players were shipped in the middle of June 2006, though HD DVD players beat them in the race to the market by a few months.[39][40]
The first Blu-ray Disc titles were released on June 20, 2006. The earliest releases used MPEG-2 video compression. This is the compression method used on DVDs. The first releases using the newer VC-1 and AVC codecs were introduced in September 2006.[41] The first movies using dual layer discs (50 GB) were introduced in October 2006.[42]
The first mass-market Blu-ray rewritable drive for the PC was the BWU-100A, released by Sony on July 18, 2006. It recorded both single and dual layer BD-R as well as BD-RE discs and had a suggested retail price of US$699.
HD DVD had a head start, and the Blu-ray market was slow at first. The first Blu-ray player was perceived as expensive and buggy, and there were few titles available.[43] That changed when PlayStation 3 launched, since every PS3 unit also functioned as a Blu-ray player. In February 2007, Blu-ray discs had outsold HD DVDs.[44] During the first three quarters of 2007, BD discs outsold HD DVDs by about two to one.[45]
In May 2007, Target Technology sued Sony, claiming that Blu-ray technology infringed on their patent on reflective-layer materials for optical discs.[46]
[edit] Disc structure
[edit] Laser and optics
Like its rival format HD DVD, Blu-ray uses a "blue" (technically violet) laser operating at a wavelength of 405 nm to read and write data. Conventional DVDs and CDs use red and infared lasers at 650 nm and 780 nm respectively.
The blue-violet laser's shorter wavelength makes it possible to store more information on a 12 cm CD/DVD sized disc. The minimum "spot size" on which a laser can be focused is limited by diffraction, and depends on the wavelength of the light and the numerical aperture of the lens used to focus it. By decreasing the wavelength, using a higher numerical aperture (0.85, compared with 0.6 for DVD), higher quality, dual-lens system, and making the cover layer thinner to avoid unwanted optical effects, the laser beam can be focused much more tightly at the disk surface. This produces a smaller spot on the disc and allows more information to be physically contained in the same area. In addition to the optical improvements, Blu-ray Discs feature improvements in data encoding, allowing for even more data to be packed in. (See Compact disc for information on optical discs' physical structure.)
[edit] Hard-coating technology
Since the Blu-ray data layer is closer to the surface of the disk, compared to the DVD standard, it was at first more vulnerable to scratches. The first discs were housed in cartridges for protection. Advances in polymer technology eventually made the caddies unnecessary.
TDK was the first company to develop a working scratch protection coating for Blu-ray discs. It was named Durabis. Both Sony and Panasonic replication methods include proprietary hard-coat technologies. Sony's rewritable media are sprayed with a scratch-resistant and antistatic coating. Verbatim recordable and rewritable Blu-ray Disc discs use their own proprietary hard-coat technology called ScratchGuard.
[edit] Software standards
[edit] Codecs
Codecs are compression schemes that reduce data storage requirements; both lossy and lossless compression techniques have been developed and are being used. Depending on the application, either can be used to greatly increase the amount of audio or video storable on fixed-bit-capacity media.
The BD-ROM specification mandates certain codec compatibilities for both hardware decoders (players) and the movie-software (content). For video, all players are required to support ISO MPEG-2, H.264/AVC, and SMPTE VC-1. MPEG-2 video allows decoder backward compatibility for DVDs. H.264, sometimes called MPEG-4 part 10, is a more recent video codec. VC-1 is a competing MPEG-4 derivative codec proposed by Microsoft (based on Microsoft's previous work in Windows Media 9). BD-ROM titles with video must store video using one of the three mandatory codecs (multiple codecs on a single title are allowed).
The initial version of Sony's Blu-ray Disc-authoring software shipped with support for only 1 video-codec: MPEG-2.[citation needed] Consequently, all launch titles were encoded in MPEG-2 video.[citation needed] A subsequent update allowed the content producers to author titles in any of the 3 supported codecs: MPEG-2, VC-1, or H.264.[citation needed] The choice of codecs affects the producer's licensing/royalty costs, as well as the title's maximum runtime (due to differences in compression efficiency).[citation needed] Discs encoded in MPEG-2 video typically limit content producers to around two hours of high-definition content on a single-layer (25 GB) BD-ROM. The more advanced video codecs (VC-1 and H.264) typically achieve a video runtime twice that of MPEG-2, with comparable quality.
For audio, BD-ROM players are required to support Dolby Digital AC-3, DTS, and Linear PCM (up to 7.1 channels). Dolby Digital Plus, and lossless formats Dolby TrueHD and DTS HD are player optional. BD-ROM titles must use one of mandatory schemes for the primary soundtrack (linear PCM, Dolby Digital, or DTS). A secondary audiotrack, if present, may use any of the mandatory or optional codecs.[47] If Dolby Digital Plus is used, it must be accompanied by an AC-3 soundtrack (which provides the "core" bitstream). For uncompressed PCM and lossless audio in Dolby TrueHD or DTS-HD Master Audio formats, Blu-ray Discs support encoding in up to 24-bit/192 kHz for a maximum of six channels, or up to eight channels with at most 24-bit/96 kHz sampling.[48]
For users recording digital television programming, the recordable Blu-ray Disc standard's datarate of 54 Mbit/s is more than adequate to record high-definition broadcasts from any source (IPTV, cable/satellite, or terrestrial). For Blu-ray Disc movies the maximum transfer rate is 48 Mbit/s (1.5x) (both audio and video payloads together), of which a maximum of 40 Mbit/s can be dedicated to video data. This compares favorably to the maximum of 36.55 Mbit/s in HD DVD movies for audio and video data.[49]
[edit] Java software support
Main article: BD-J
At the 2005 JavaOne trade show, it was announced that Sun Microsystems' Java cross-platform software environment would be included in all Blu-ray Disc players as a mandatory part of the standard. Java is used to implement interactive menus on Blu-ray Discs, as opposed to the method used on DVD video discs, which uses pre-rendered MPEG segments and selectable subtitle pictures, which is considerably more primitive and less seamless. Java creator James Gosling, at the conference, suggested that the inclusion of a Java Virtual Machine as well as network connectivity in BD devices will allow updates to Blu-ray Discs via the Internet, adding content such as additional subtitle languages and promotional features that are not included on the disc at pressing time. This Java Version is called BD-J and will be a subset of the Globally Executable MHP (GEM) standard. GEM is the world-wide version of the Multimedia Home Platform standard.
[edit] Region codes
Regions for Blu-ray standard[50]
Blu-ray discs may be encoded with a region code intended to restrict the area of the world in which they can be played, similar to the DVD region codes. Blu-ray players sold in a certain region should only be able to play discs encoded for that region. The purpose of this system is to allow motion picture studios to control the various aspects of a release (including content, date and, in particular, price) according to the region. Discs can also be produced without region coding, so they can be played on all devices.
Region code
Area[51]
A
North America, Central America, South America, Japan, Taiwan, North Korea, South Korea, Hong Kong and Southeast Asia.
B
Europe, Greenland, French territories, Middle East, Africa, Australia and New Zealand.
C
India, Bangladesh, Nepal, Mainland China, Pakistan, Russia, Central and South Asia.
This arrangement puts the countries of the major Blu-ray manufacturers (Japan, Korea, Malaysia) in the same region as the U.S., thus ensuring early releases of U.S. content to those markets, whereas they weren't before. Reportedly early BD releases (including Casino Royale) are "ALL" region and therefore compatible in various BD players around the globe.
[edit] Digital rights management (DRM)
The Blu-ray Disc format employs several layers of Digital rights management.[52][53] They have been at least partially circumvented.
Advanced Access Content System is a standard for content distribution and digital rights management. It is developed by AACS Licensing Administrator, LLC (AACS LA), a consortium that includes Disney, Intel, Microsoft, Matsushita (Panasonic), Warner Bros., IBM, Toshiba and Sony.
Since appearing in devices in 2006, several successful attacks have been made on the format. The first known attack relied on the trusted client problem. In addition, decryption keys have been extracted from a weakly protected player (WinDVD). However, even though some AACS cryptographic keys have been compromised, new releases will use new, uncompromised keys.
BD+ was developed by Cryptography Research Inc. and is based on their concept of Self-Protecting Digital Content.[54] BD+ is effectively a small virtual machine embedded in authorized players. It allows content providers to include executable programs on Blu-ray Discs. Such programs can:[52]
examine the host environment, to see if the player has been tampered with. Every licensed playback device manufacturer must provide the BD+ licensing authority with memory footprints that identify their devices.
verify that the player's keys have not been changed.
execute native code, possibly to patch an otherwise insecure system.
transform the audio and video output. Parts of the content will not be viewable without letting the BD+-program unscramble it.
If a playback device manufacturer finds that its devices have been hacked, it can potentially release BD+-code that detects and circumvents the vulnerability. These programs can then be included in all new content releases.
The specifications of the BD+ virtual machine are only available to licensed device manufacturers. A list of licensed adopters is available from the BD+ website.
BD+ was made available for content publishers in June 2007.[55] The first titles using BD+ were released in October the same year. Several players had problems playing back those titles.[56] BD+ has been circumvented by the developers of the program AnyDVD as of version 6.1.9.6 beta.[57]
BD-ROM Mark is a small amount of cryptographical data that is stored physically differently from normal Blu-ray Disc data. Bit-by-bit copies that do not replicate the BD-ROM Mark are impossible to decode. A specially licensed piece of hardware is required to insert the ROM-mark into the media during replication. Through licensing of the special hardware element, the BDA believes that it can eliminate the possibility of mass producing BD-ROMs without authorization.
When the first AACS keys were leaked, some Blu-ray titles became available on file-sharing networks. There is also a commercial PC software player (AnyDVD HD) that allowed users to watch Blu-ray Disc movies on non-HDCP compliant PC hardware or copy them.
[edit] Player profiles
The BD-ROM specification defines four profiles of Blu-ray Disc players; in addition to the three listed in the table below, there is a fourth audio-only profile that does not require video decoding or BD-J.[citation needed] All the video-based profiles are required to have a full implementation of BD-J, but with varying levels of hardware support.
Feature[58]
BD-Video (Grace Period Profile – Profile 1.0)
Bonus View (Final Standard Profile – Profile 1.1)
BD-Live (Profile 2)
Built-in persistent memory
64 KB
64 KB
64 KB
Local storage capability[a]
–
256 MB
1 GB
Secondary video decoder (PiP)
Optional
Mandatory
Mandatory
Secondary audio decoder[b]
Optional
Mandatory
Mandatory
Virtual file system
Optional
Mandatory
Mandatory
Internet connection capability
No
No
Mandatory
^ a This is used for storing audio/video and title updates. It can either be built in memory or removable media, such as a memory card or a USB flash memory.
^ b A secondary audio decoder is typically used for interactive audio and commentary
On November 1, 2007, the Grace Period Profile was superseded by "Bonus View" as the minimum profile for new players released to the market.[59] With the possible exception of the PS3, profile 1.0 players cannot be upgraded to be Bonus View compliant.[60] Notably, A Sony VP has stated that Playstation 3 will receive an update that will enhance upon the console's Blu-ray Disc interactivity, however has not indicated that it will become 1.1 compliant nor has a date been provided.[61] When software authored with interactive features dependent on "Bonus View" hardware capabilities are played on profile 1.0 players some features may not be available or may offer limited capability. Profile 1.0 players will still be able to play the main feature of the disc, however.[citation needed]
[edit] Backward compatibility
While it is not compulsory for manufacturers; the Blu-ray Disc Association recommends that Blu-ray Disc drives should be capable of reading standard DVDs for backward compatibility. For instance, Samsung's first Blu-ray Disc drive can read CDs, regular DVDs, and Blu-ray Discs. All other Blu-ray Disc players released support DVD playback as well, however not all support CD playback. This includes Sony, Panasonic, Philips, LG, Pioneer and PC-based players from Alienware, Sony, and Dell.
[edit] List



.JPG)
